Moving Colorado Sheriffs to the Cloud

What is CSOC?

County Sheriffs of Colorado is an association of County Sheriffs that works toward continuing education and professional training of sheriffs, deputies, and other law enforcement agencies. The main aim of the more than 120 lectures and training programs CSOC offers, is to educate the law enforcement personnel as to how they can better serve their community.

The programs also give a platform for and advocates unity among sheriffs in differing counties so they can better understand one another�s problems and work toward progressive solutions. CSOC is the perfect platform for law enforcement officers across the State of Colorado to allow them to achieve professional excellence and to serve the people in the best ways possible.

What Challenges CSOC Faced

The nature of CSOC�s business requires that they keep extensive records on membership, course attendance, dues, and more for the law enforcement officers who participate with them. With the system they had at their disposal prior to their connection with DUBTEL, was not conducive to updating those records in such a way that they were secure, complete and correct.

The technology used to create the system which they used was severely outdated and hindered them from making forward strides and growing without exceeding the capabilities of their current administration tools.

In order for an outfit of CSOC�s type and size to succeed, they would need an entirely new system with the ability to update records of all types across the entire system in real time.

How DUBTEL Was Contacted

DUBTEL maintains working partnerships with many companies across the United States and continues to grow and help its partners grow through that network of partnerships. One of DUBTEL�s partners�machineLOGIC�shared a business relationship with CSOC. When technicians at machineLOGIC saw and heard all the problems in the existing system for CSOC, machineLOGIC called DUBTEL and set up a meeting to get their needs addressed.

Once DUBTEL was put in contact with CSOC to help them to overhaul their system and optimize their operations, the real work began for this law enforcement training outfit.

What DUBTEL Did for CSOC

One of the main things that is crucial to the operation of CSOC is to make sure that the records of all these conferences, meetings and training sessions is kept safe and is updated regularly. They also must keep a track of all the people that have attended these training sessions, or any other program hosted by CSOC. In order to make a more workable system that provided a higher quality of user experience to associates and members, CSOC needed the ability to update and edit their records in real time. By doing this all the operations would be streamlined, significantly increasing the efficiency of the organization. But how do you make that happen? The obvious answer to that given by DUBTEL was to move these records, files and system to cloud.

Among all the benefits that you get from a cloud-based system the one that was most significant to a client like CSOC is the security that comes with it. Files uploaded on a cloud-based system are much more secure than other file storage means. The companies hosting cloud servers can afford to have far better security systems as compared to any local system. By uploading the files on cloud server CSOC safeguarded them from any hacking attempt from cybercriminals. The next major advantage that this update gave to CSOC is the ability of cloud data to be updated in real time across all terminals. The best part is that the data can be updated remotely. As CSOC works across the State of Colorado this feature allowed them to easily update the data from where ever the law enforcement training is being held. The data uploaded from any location across any terminal would be automatically updated in the central database.

The New & Improved CSOC System

The CSOC team now does not have to spend hours of their time only on data entry as the process has become very easy and streamlined. The time that they save from data entry can be spent on more involved operations to help the organization grow and to continue to assist law enforcement officers across the State of Colorado.

They can now invest this time in improving the quality of their services and coursework and grow their association in order to reach more people. This integration has allowed them to thrive on a financial level as well, now that they are able to keep records of and invoice fees, dues, and payments effortlessly.

Another benefit that CSOC got from this integration is that their website is now fully updated according to the data available on the cloud server, in real time. This makes sure that all the members of this organization are now always fully updated regarding important statistics of the organization or any other changes or announcements that are important to them and their members.

New features were implemented in their system such as the Waitlist Feature, which allows law enforcement officers to be sure they never miss a single class with CSOC. The Revised Certification Management allows law enforcement officers to access their training certifications at any time, from any location. These features work in tandem with the Real-Time Reporting system enhancement to ensure that everyone is operating on the most current, up-to-date information and no one skips a beat.

Find out how DUBTEL can help your business reach its full potential. Request a Demo today.

DUBTEL Goes to Bootcamp

Who is StartUpCincy
�A community of entrepreneurs, BigCos, educators, investors, creatives and enthusiasts. Our mission is to build a sustainable, tech-based economy for our city, our region and the entire Midwest. Collectively, we are Greater Cincinnati�s startup community and we're here to create a new future. We are StartupCincy.�

StartUpCincy is a network of entrepreneurs, enthusiasts, investors and businessmen in the Greater Cincinnati area that strive to help small businesses and startups in the area to start, learn, grow and thrive by hosting events, providing networking opportunities, and learning experiences to give business owners the tools they need for unbridled success.

In keeping with StartUpCincy�s mission in this area, one of the events that they host is the NITRO! Bootcamp, which is an exciting opportunity for small businesses in the Greater Cincinnati area.

What is NITRO Bootcamp
To quote the website at, �NITRO! Bootcamp is a free first-of-its-kind event set to power up minority and women-owned small businesses by providing access and training on today�s top business technologies. We know managing a business is no small feat��there isn�t a lot of spare time to go around. That�s why we�ve talked to the experts and discovered the best tech for empowering small businesses to grow and succeed.�
NITRO! Bootcamp is an excellent opportunity for small businesses that were started and are run by minorities in the Greater Cincinnati area to meet and to get acquainted with tools that can give them the leg up they need to succeed in business.
This bootcamp hosts a full day of training sessions on different aspects of running a business, like: accounting, communication & organization, billing, payments, inventory & shipping, document cloud storage, project management, and freelancer creative services. This sort of high-intensity curriculum is the perfect battery to get a small business into gear to build and to surpass all expectations in business.
Each year 25 companies are selected to participate in this event and are given the opportunities to network, learn, grow, and establish more business in the coming year.

Why DUBTEL Was Chosen
DUBTEL�a small tech company in West Chester, Ohio�was founded by John Opoku who is originally from Ghana.
DUBTEL has grown considerably in just the last 2 years with projects in the pipeline to help small businesses grow and thrive all over the country.
With the software development, consulting, and hardware solutions that DUBTEL provides, other businesses can make their visions a reality and bring their projects to a done. Keeping other small businesses going and thriving is part of what DUBTEL does, so taking part in StartUpCincy�s NITRO! Bootcamp is part and parcel to its mission.
Why February 23rd is Significant
The 2019 NITRO! Bootcamp will be held on the 151st birthday of W. E. B. Du Bois. He was the first African American man to earn a Ph. D. from Harvard University and he was the co-founder of the National Association for the Advancement of Colored People (NAACP) in 1909.
Du Bois wrote extensively on the subject of, and was the best-known spokesperson and advocate for, African-American rights in the first half of the 20th century.
For this event that is predicated on helping businesses founded and run by minorities, it is a perfect way to honor the late, great W. E. B. Du Bois!


Find out how DUBTEL can help your business reach its full potential. Request a Demo today.

Getting Started 

Login 

Power on � POS 
  1. To Switch on the POS click on the power button on the right side of the device (Samsung Note) and when asked to enter your PIN number. It will take you to the home page. 
Charging  POS 
  1. Plug the supplied USB connector into the power/accessory interface connector on the bottom of your device. 
  2. Plug the wall charger into an electrical outlet. 
  3. To ensure your device is fast charging, open the Notification Panel by swiping from the top of the screen to the bottom. 
Sign In via POS 
  1. To sign into the POS using your Samsung Note, open the Dubtel POS app already installed in your device. 
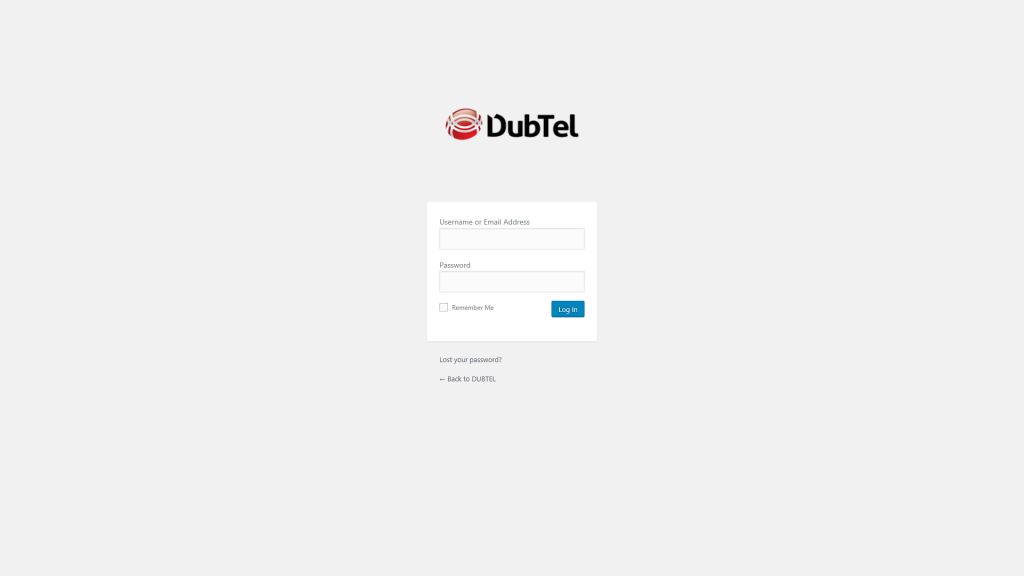
  2. The Login page will be displayed. Enter your user name and password and click login as shown below.
  3. It will take you to the home page. 

Setup Receipt Printer

Selecting Printer
  1. Open the pre-installed DUBTEL Print Service app.
  2. Select the printer in the list to use it for future orders.

Process a Sale

Add to cart
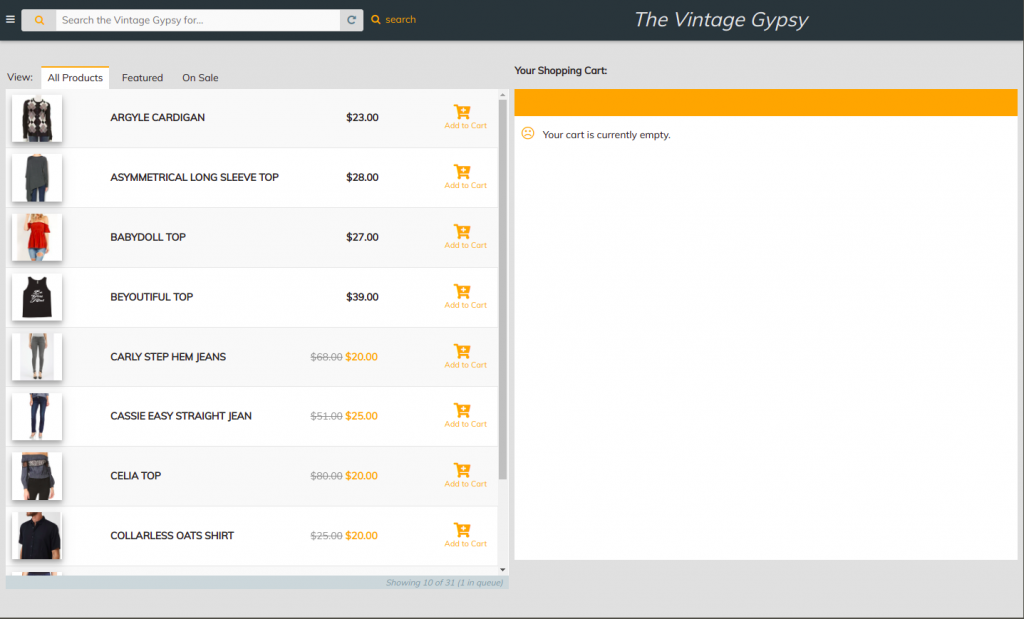
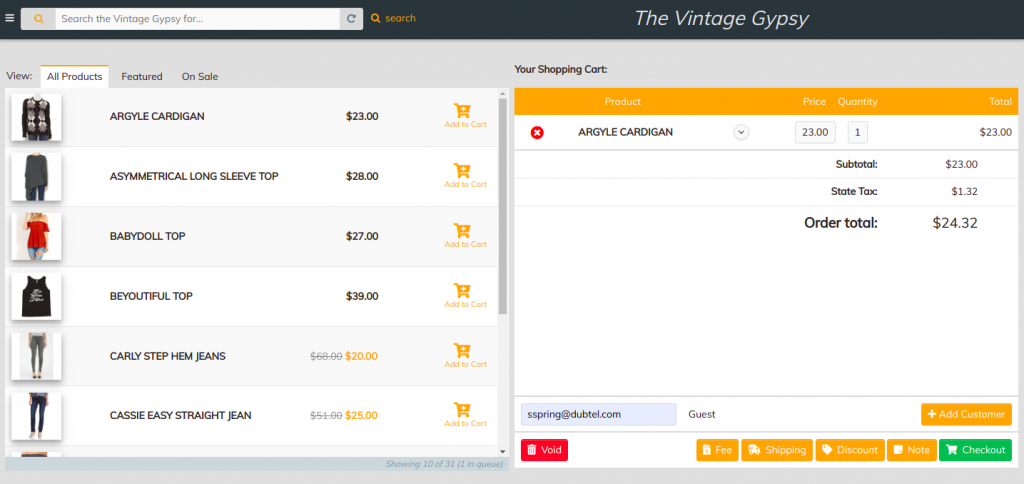
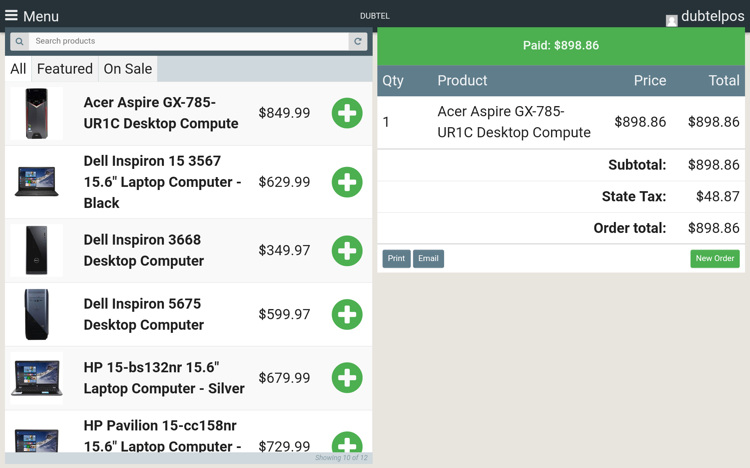
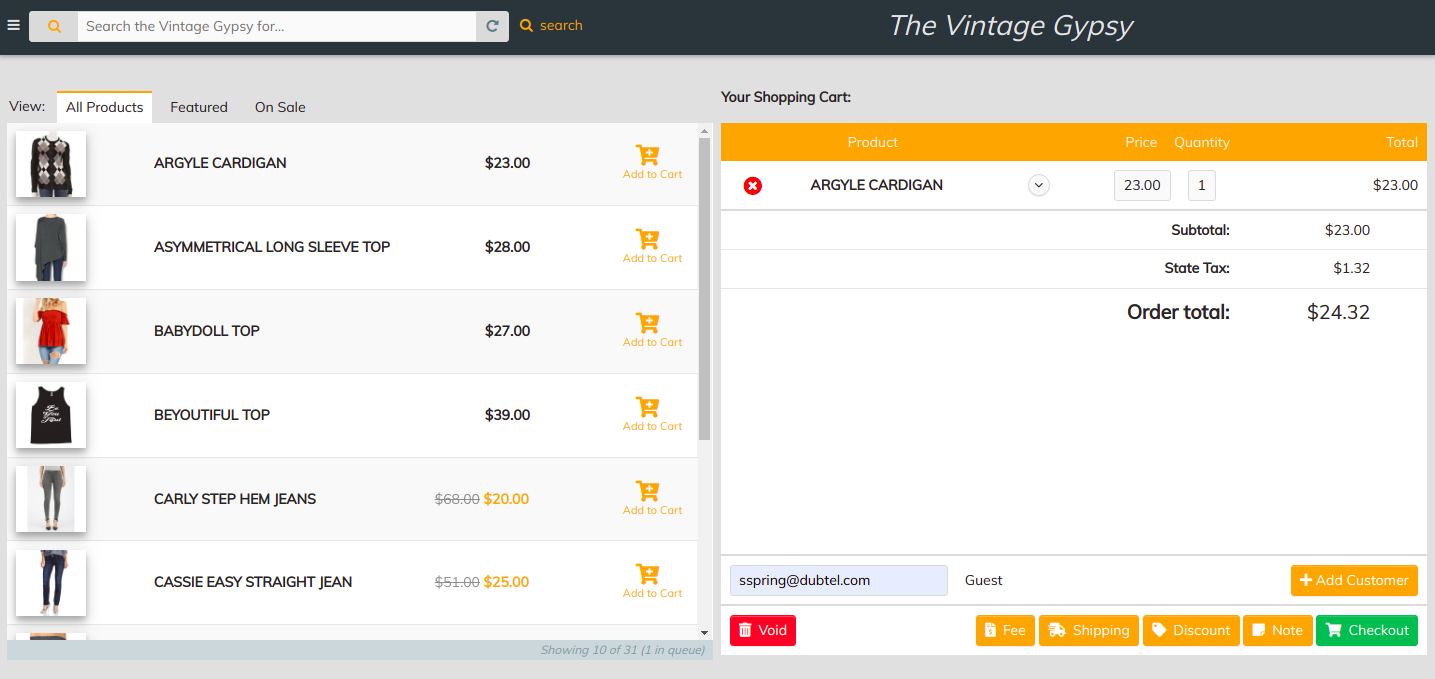
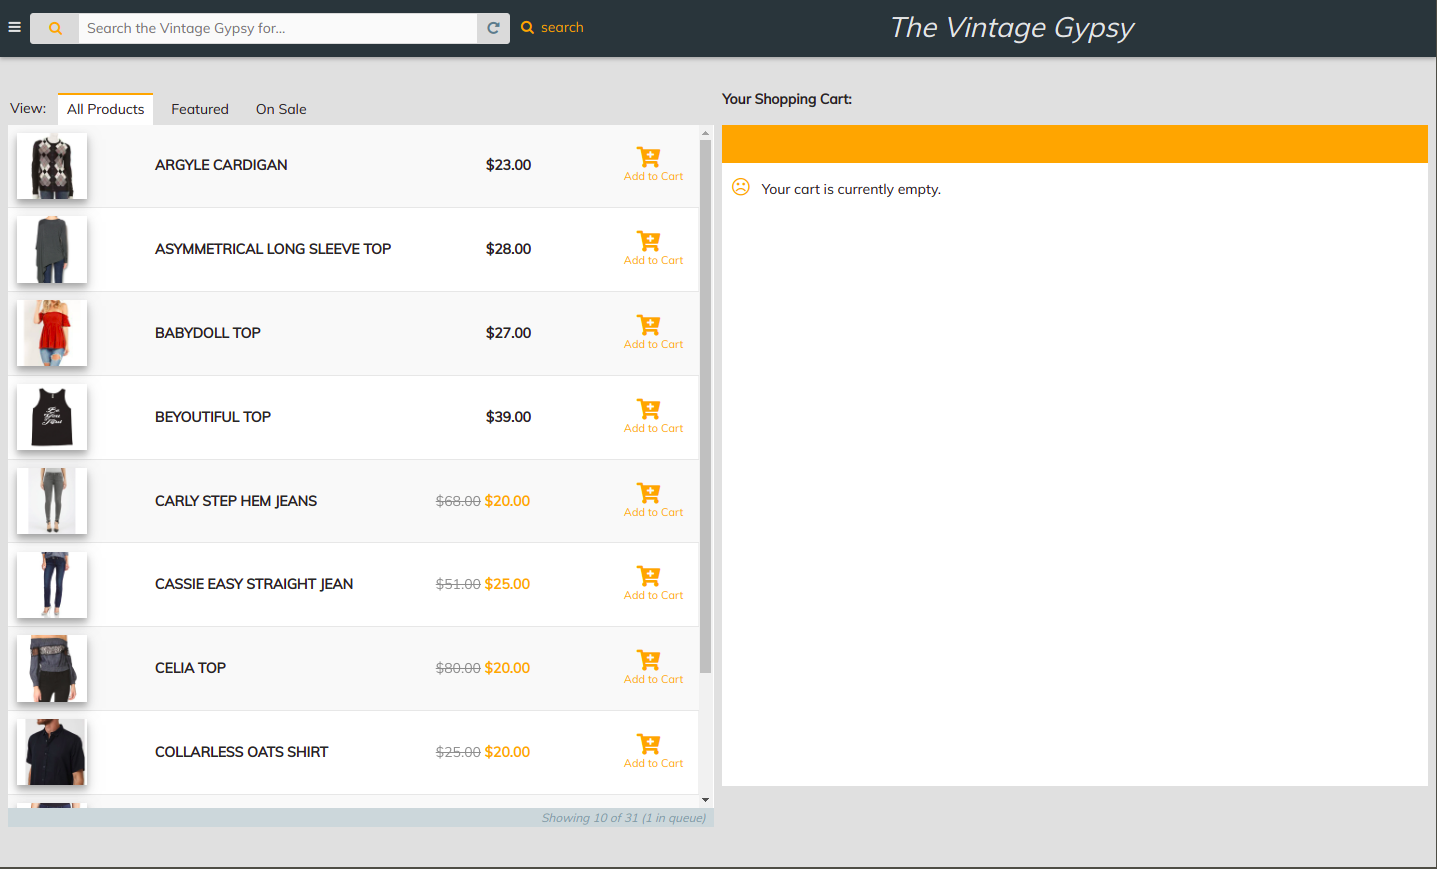
  1. To Add product to cart click on the green plus button. The items selected will be displayed as shown below.

Check out � POS

Checkout via Cash
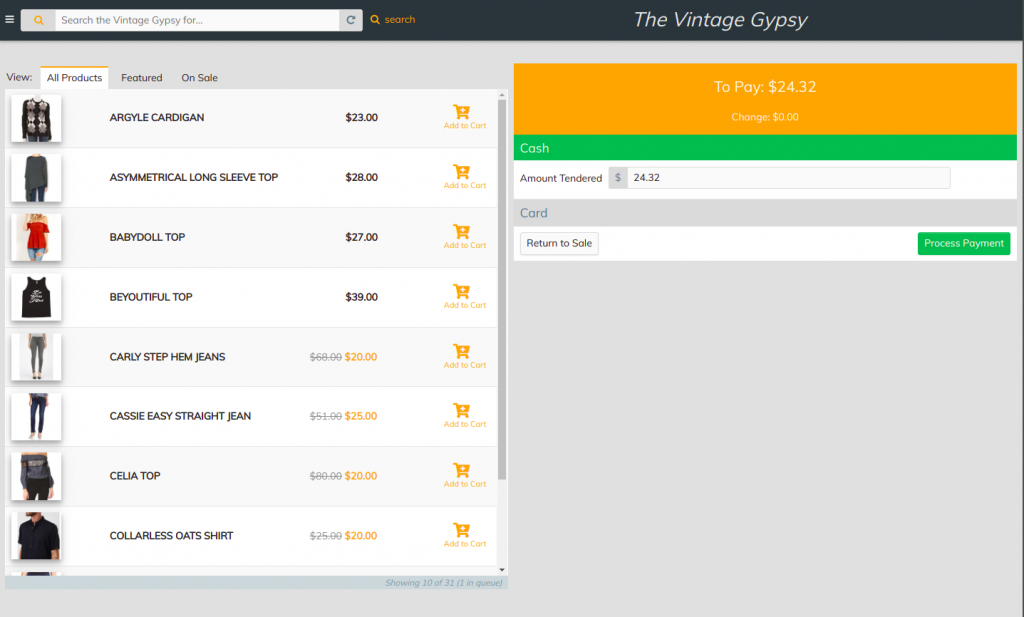
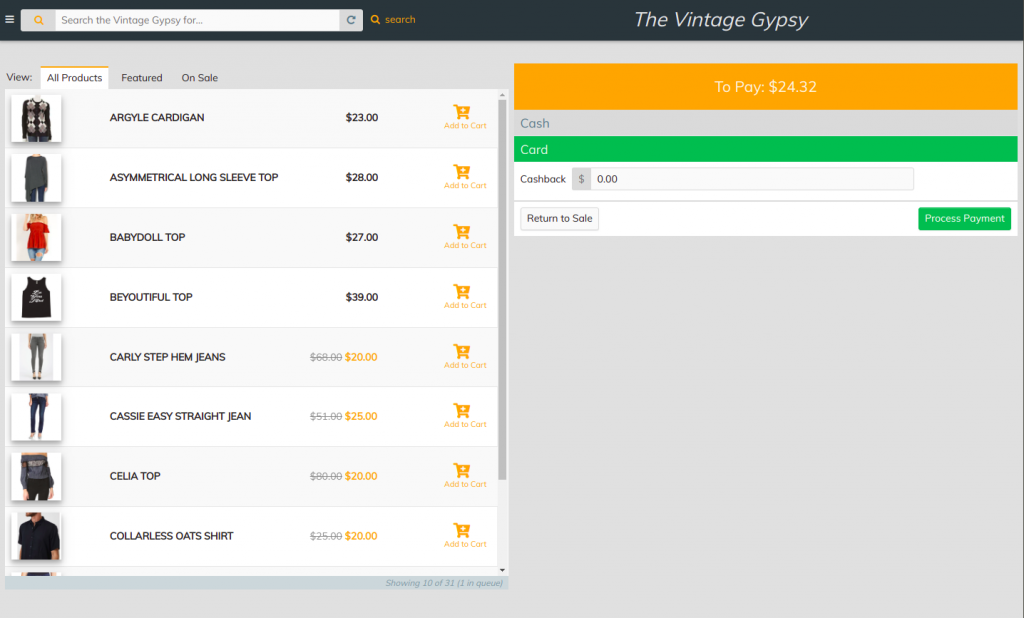
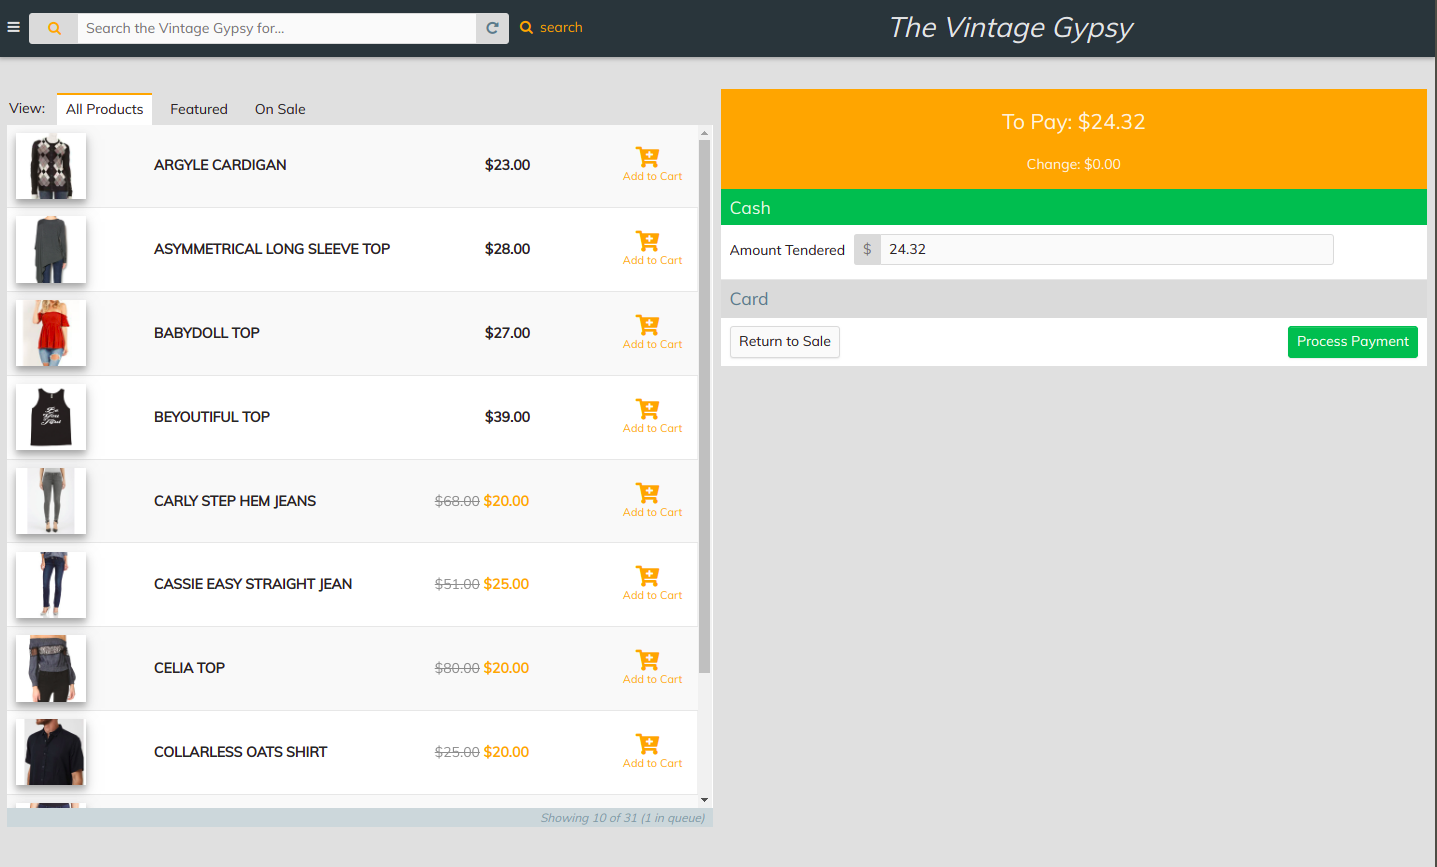
  1. To check out via cash click on the checkout button and it will take you to the check out page.
  2. The default tab will be cash.
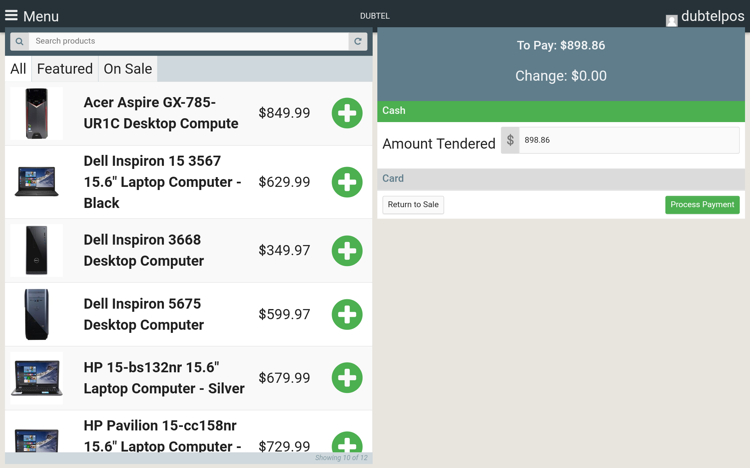
  3. The total amount will be shown on the �Amount Tendered� box.
  4. Once you collect the cash, click �Process Payment� button.
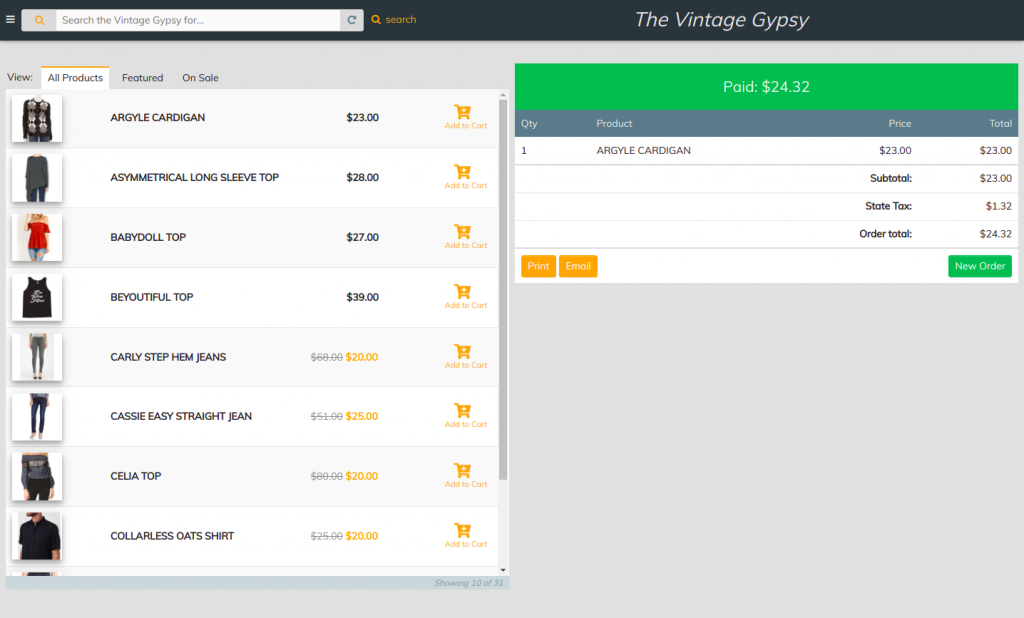
  5. It will take you to receipt page.
  6. To continue shopping click �New order� button.
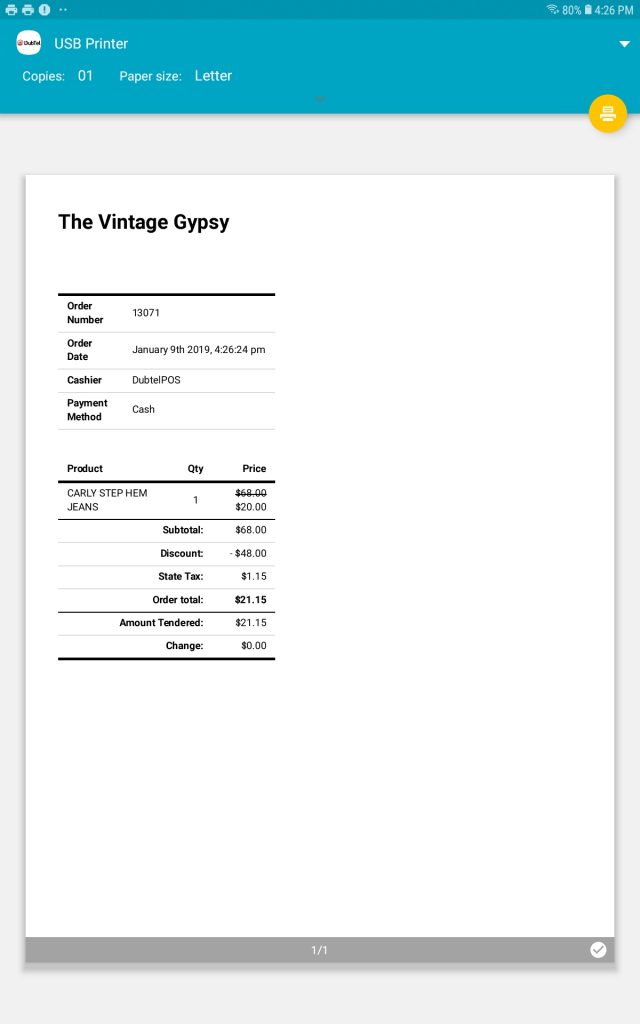
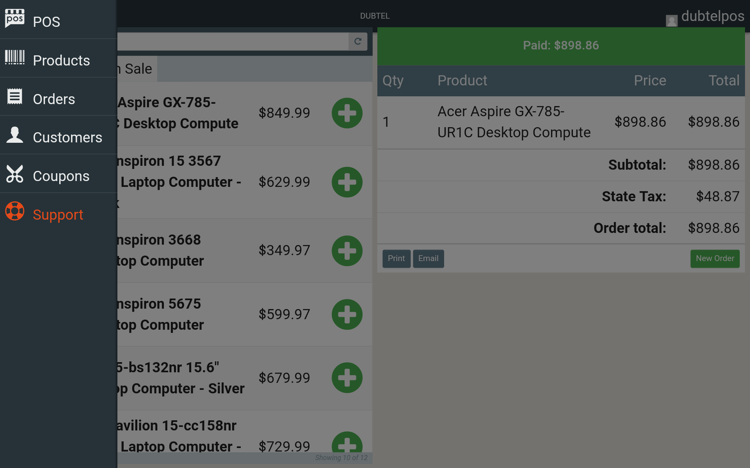
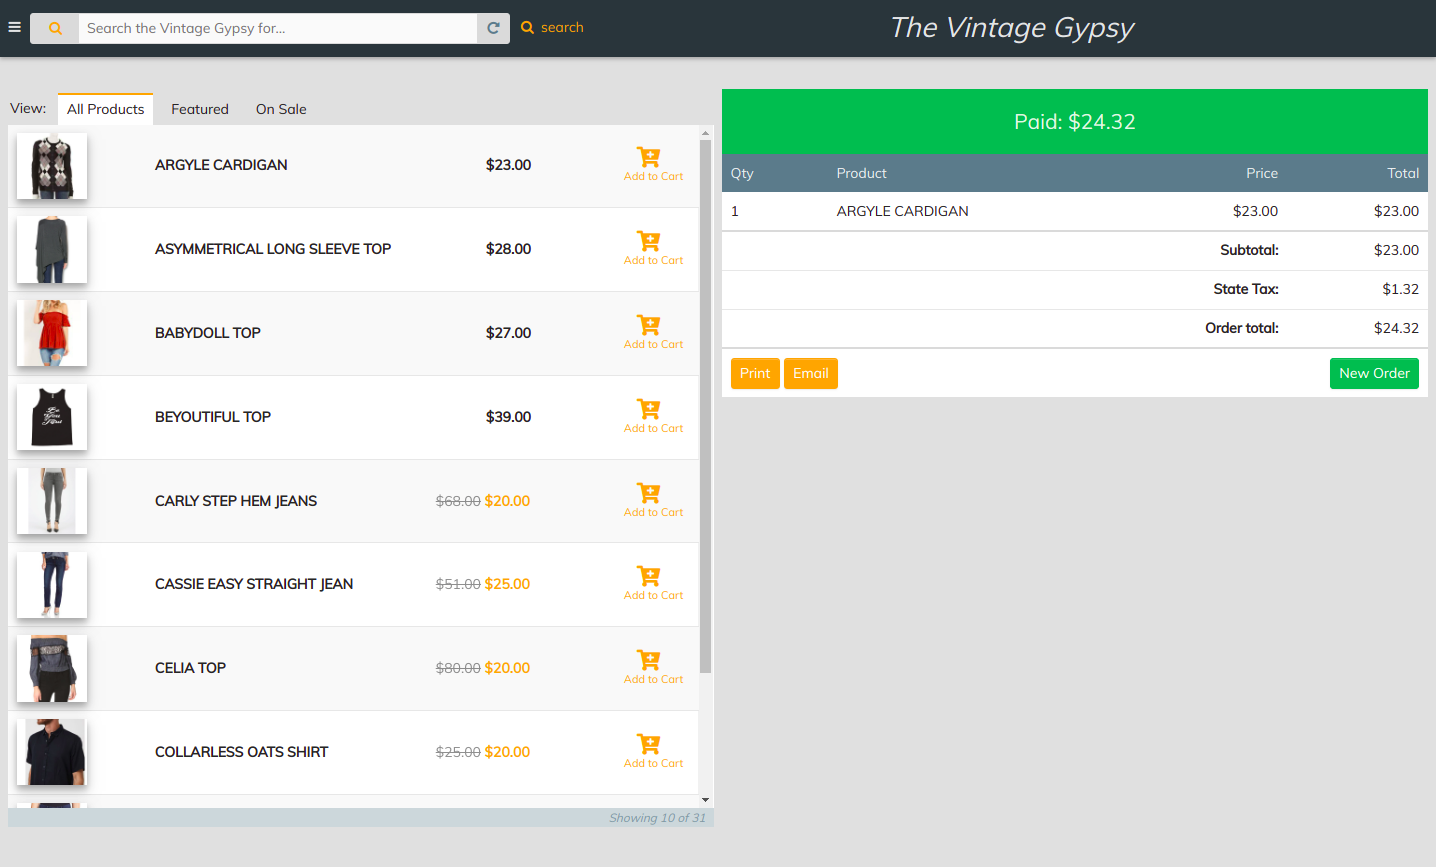
  7. Receipt can be printed out and sent via email. See pictures below.


Check out via Card
  1. To check out via card click on the checkout button and it will take you to the check out page.
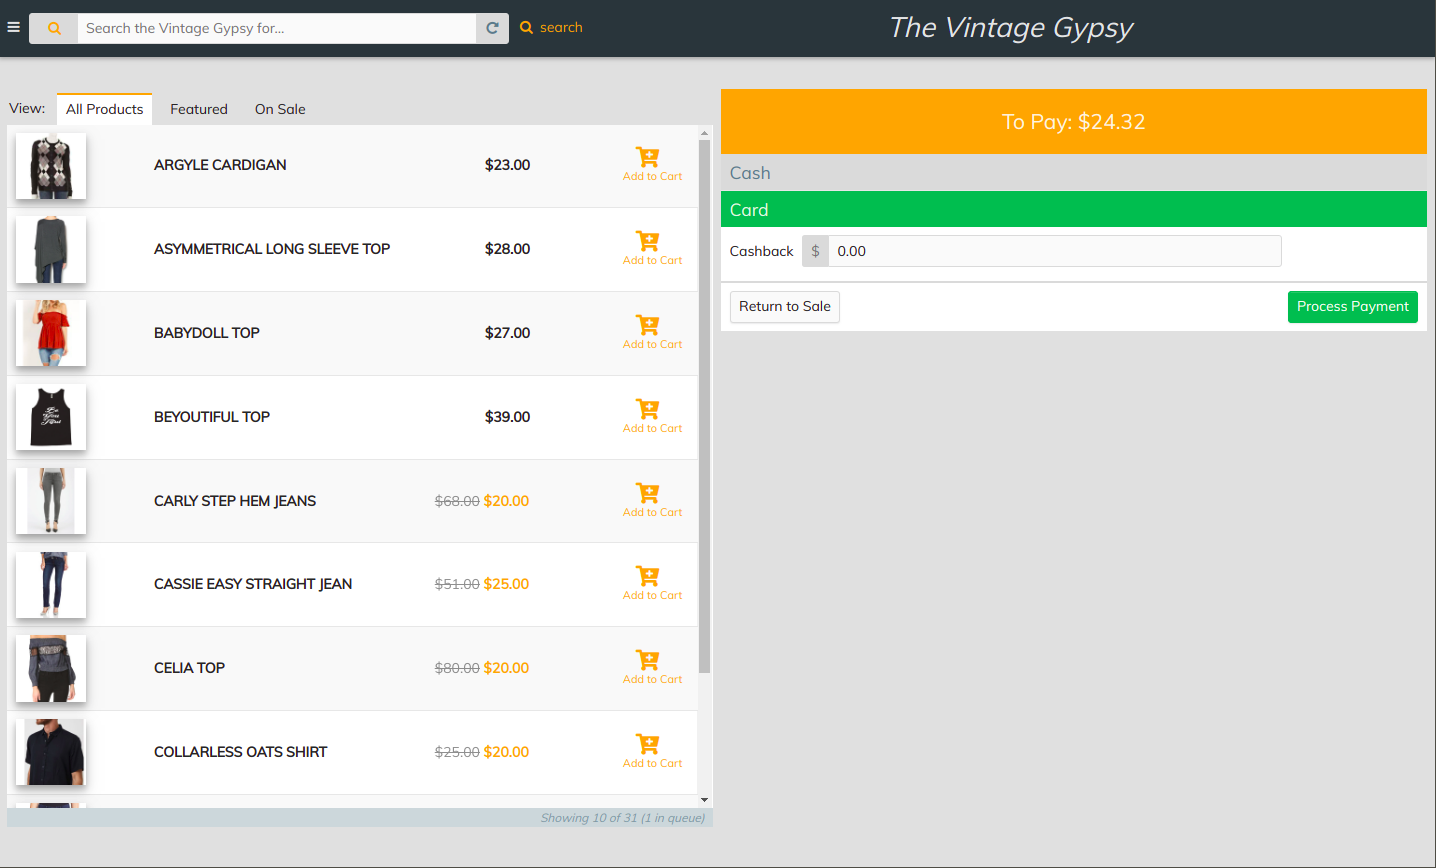
  2. Click on the card tab.
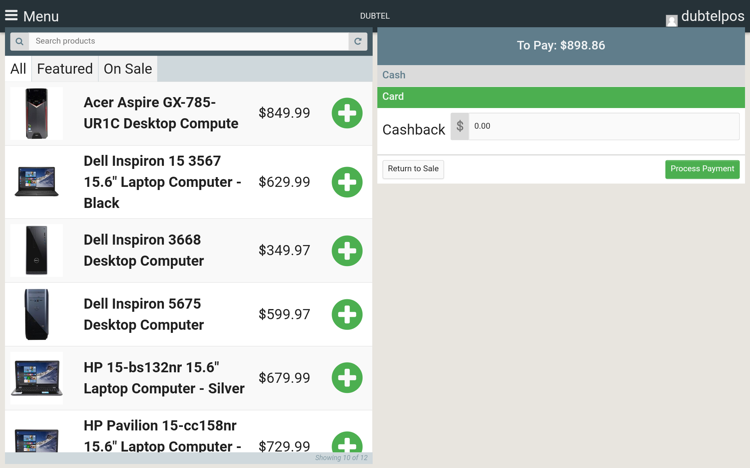
  3. If you need any cashback, enter the amount.
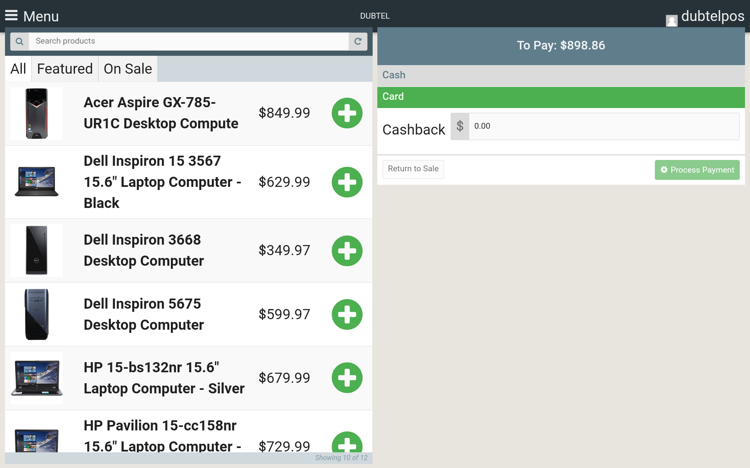
  4. Click process payment button.
  5. It will take you to the assigned card reader on the machine.
  6. Once the payment is processed, it will take you to the receipt page.
  7. To continue shopping, click �New Order� button.
  8. Receipt can be printed out and sent via email. See pictures below.


Printing

  1. Press the "Print" button.
  2. A preview will show up and the printer icon can be pressed to confirm.
  3. The first time you print, the device will ask 
    "Allow the app DUBTEL Print Service to access the USB device?
    * Use by default for this USB device"
    Press OK

Refund � POS

Refund orders through cash
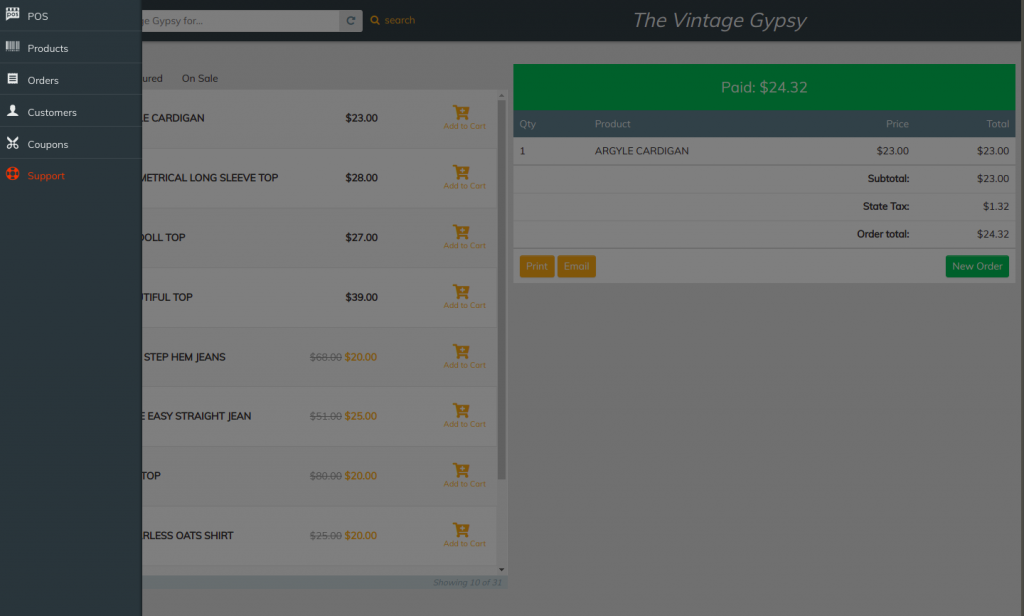
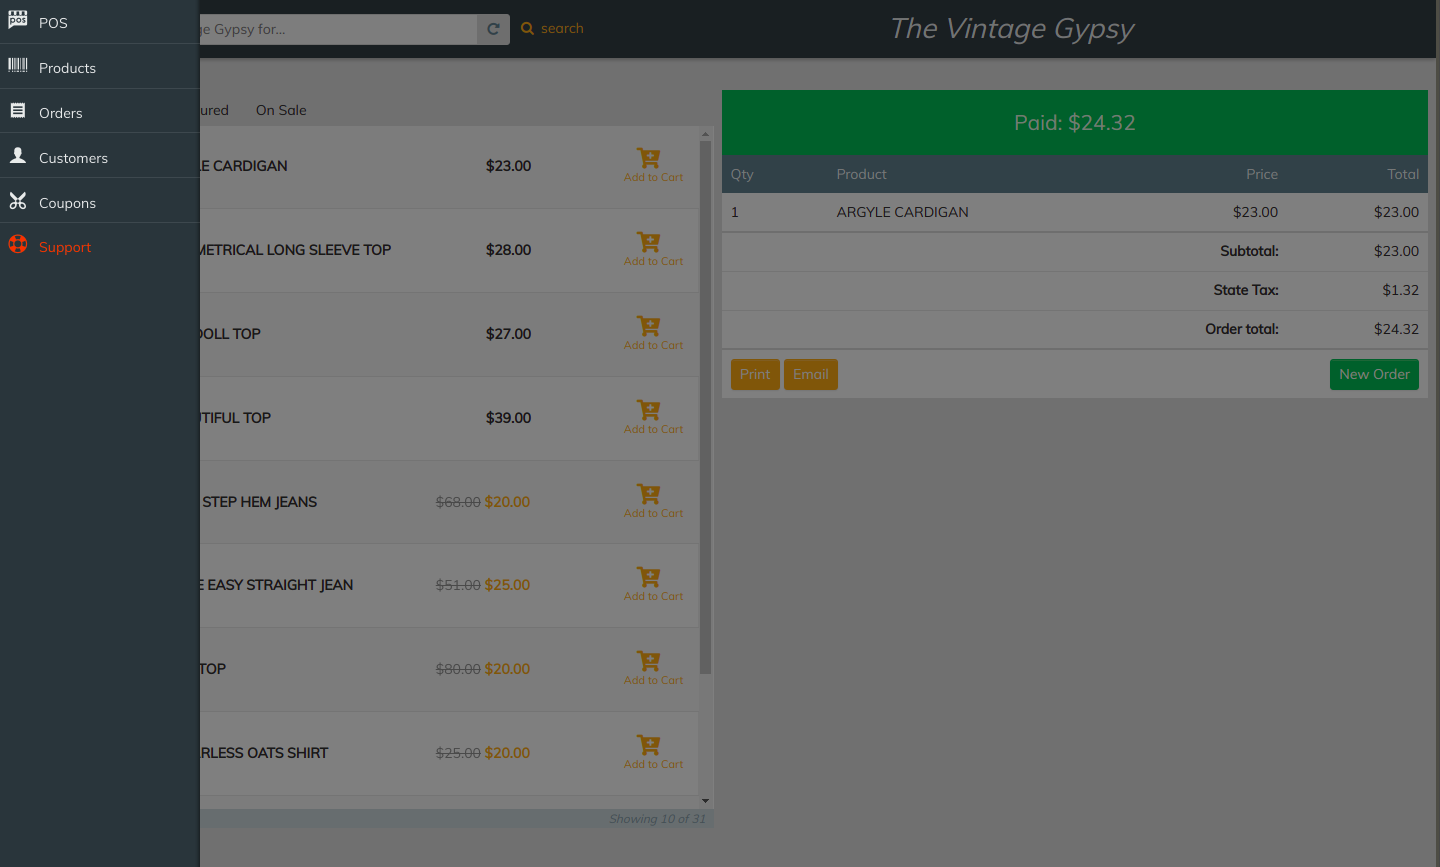
  1. To refund, Click on the Menu on the top left of the screen.
  2. Click �Orders� from the Menu as shown below.


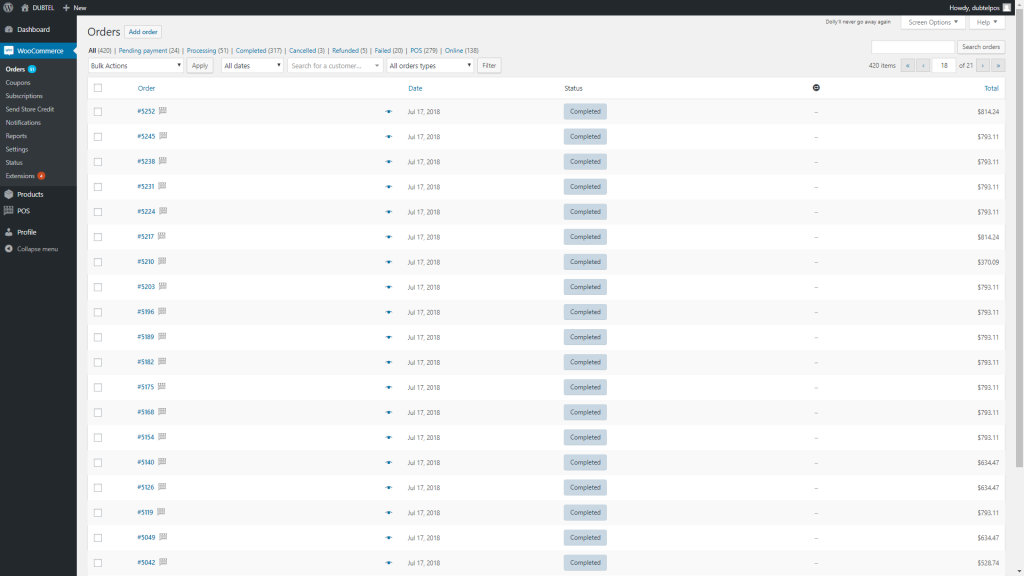
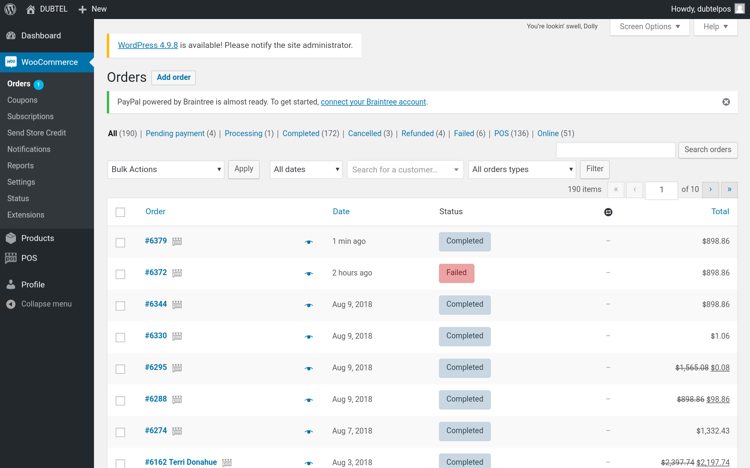
     3. It will take you to the orders list as shown below.


     4. Select the order to refund.

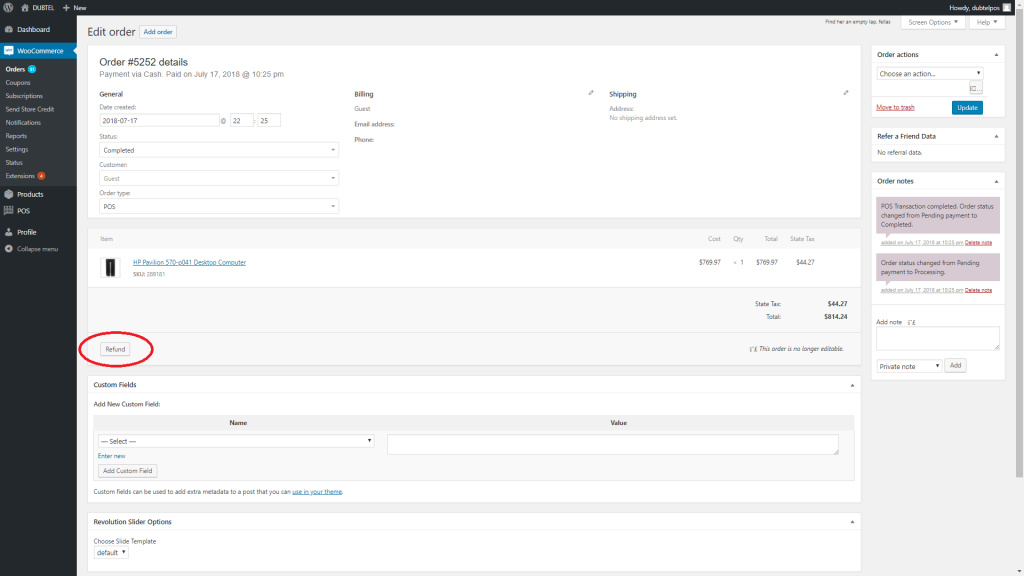
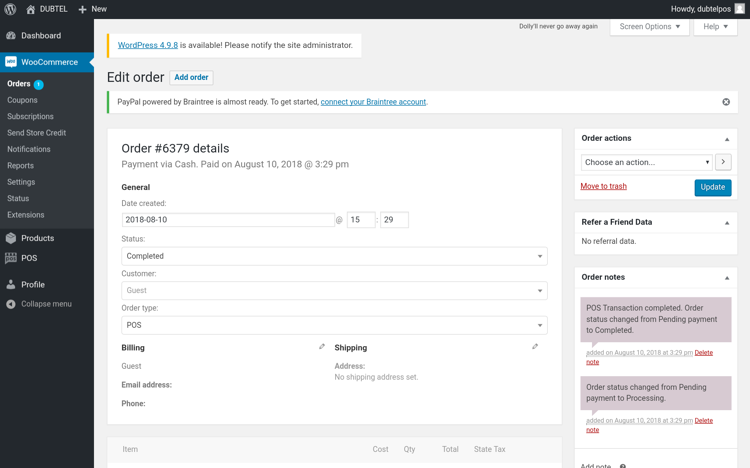
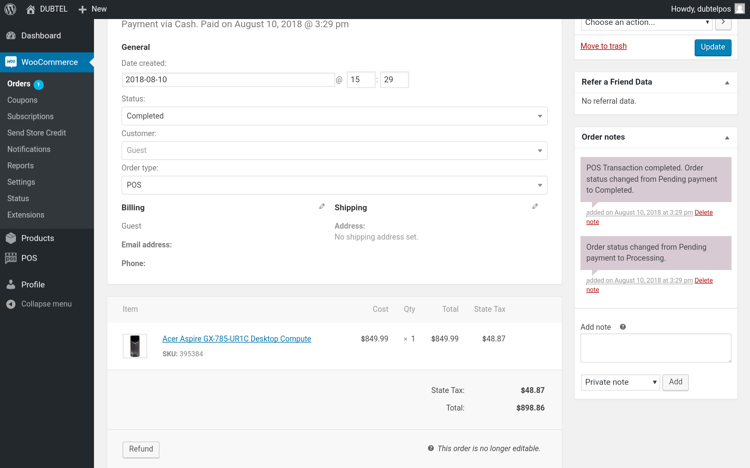
     5. Edit order page is shown. Scroll down to order details

     6. Click on the refund button.


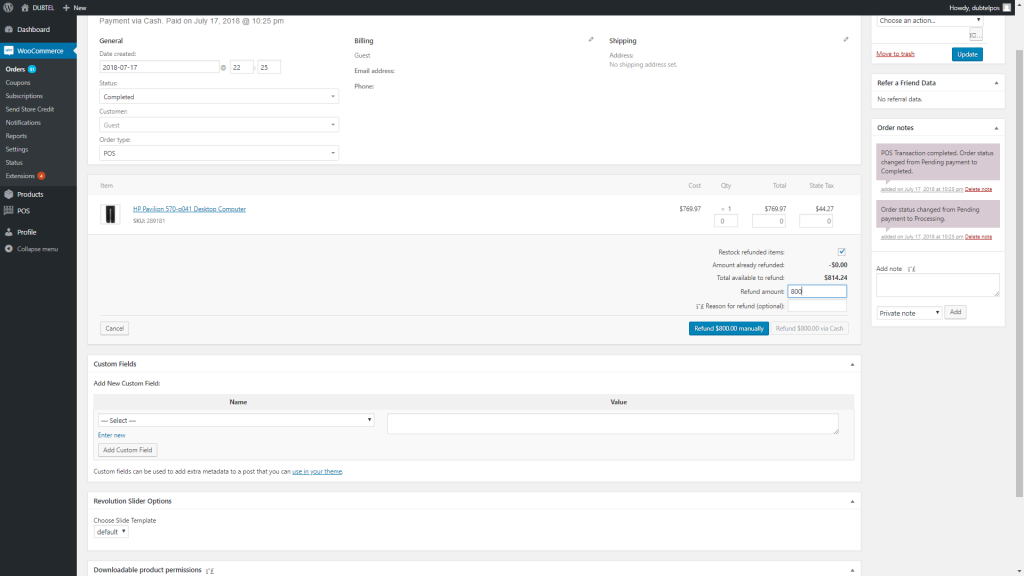
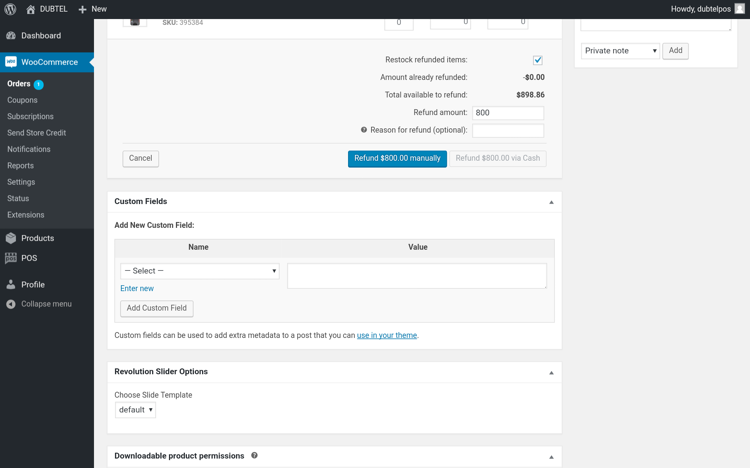
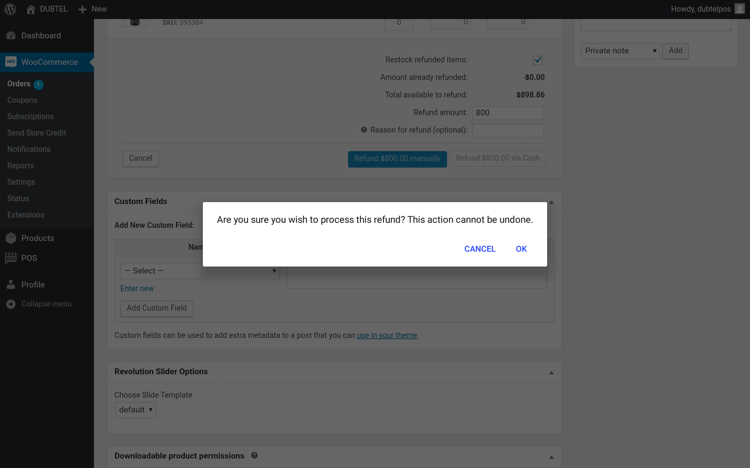
     7. Enter the refund amount and reason for refund which is optional as shown below.


     8. Click �Refund $Amount manually� button.

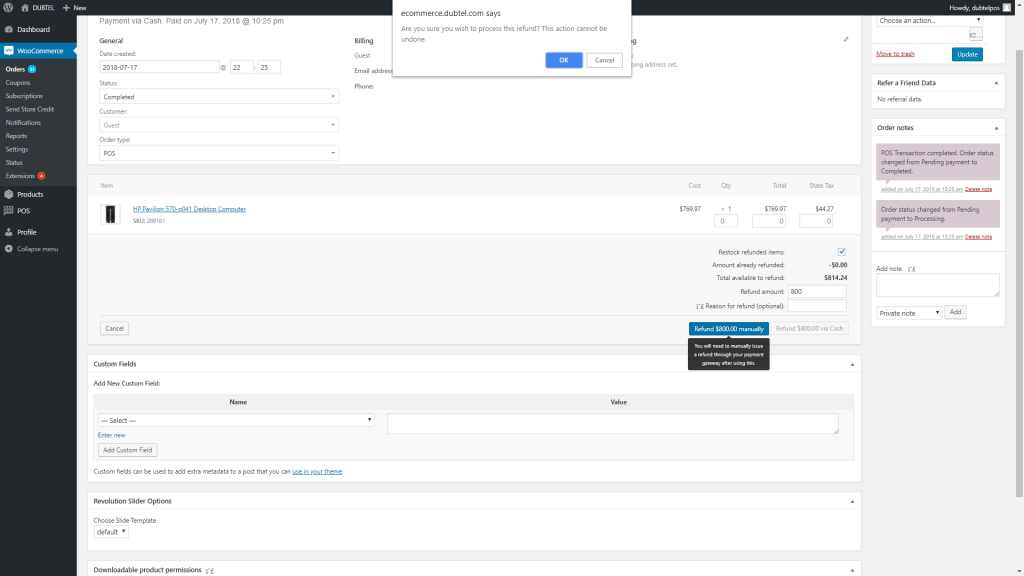
     9. A dialogue box will appear to confirm the refund. Click OK.


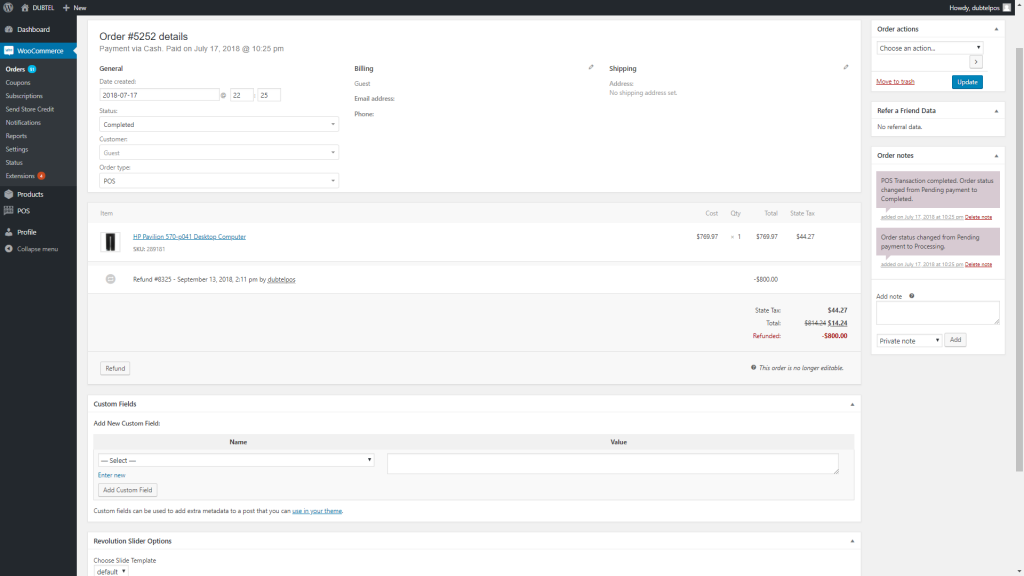
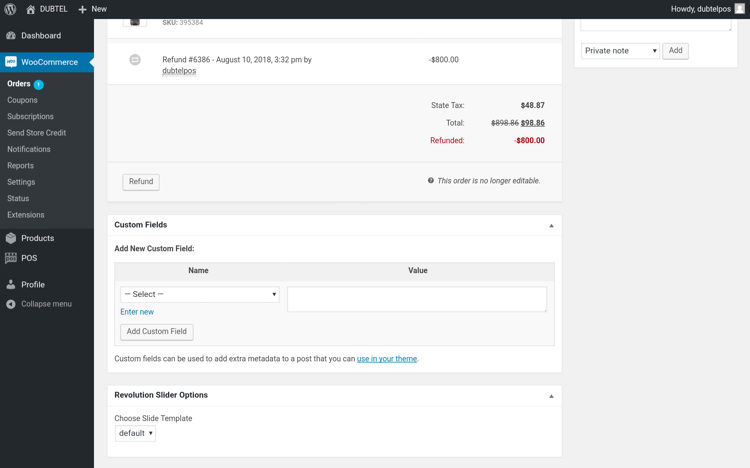
     10. The order detail page will show the refunded amount in red.

Refund orders though card
  1. Follow the same as Refund through cash from steps 1 through 10.
  2. To refund payments through card, once you click OK, It will redirect you to the assigned card reader and follow the steps to refund as per the card reader.
  3. Once refund processed successfully, the refunded amount will be displayed in red.

Manage Your Store

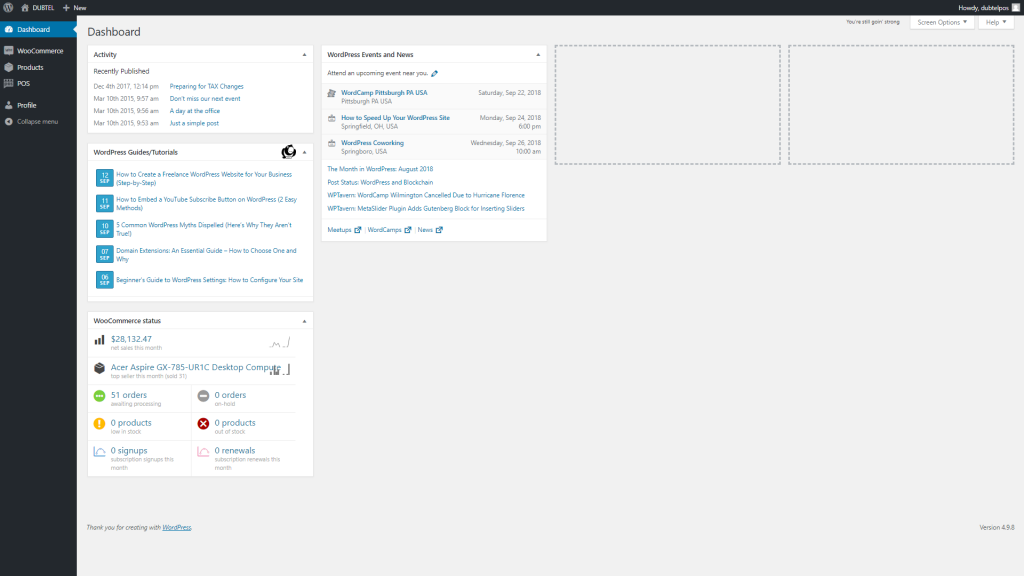
Sign in to POS from PC
  1. Go to the wp-admin URL of your store. Login page will be displayed.
  2. Enter email and password. Click Login.
  3. It will take you to the store.
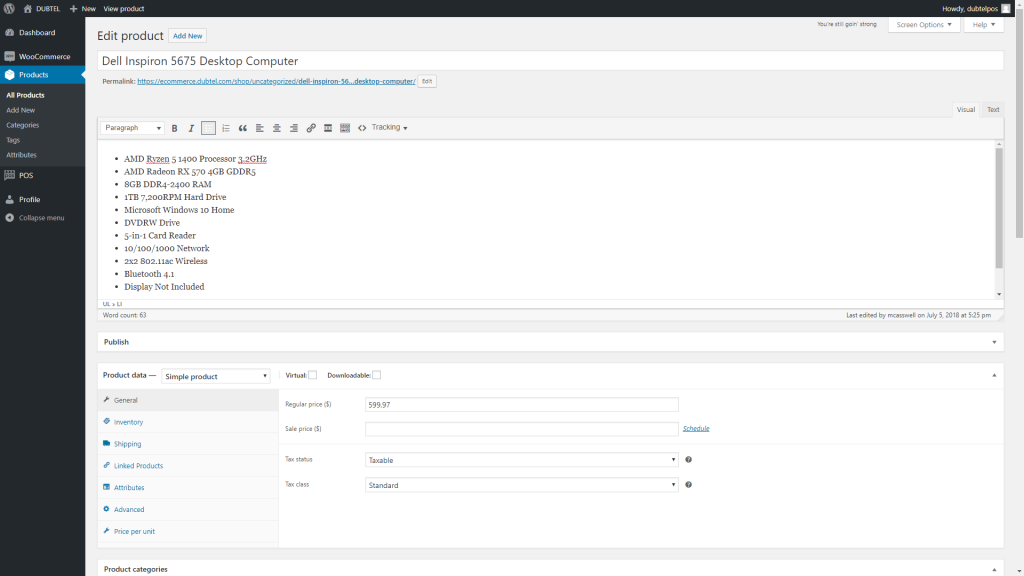
Add products to your store
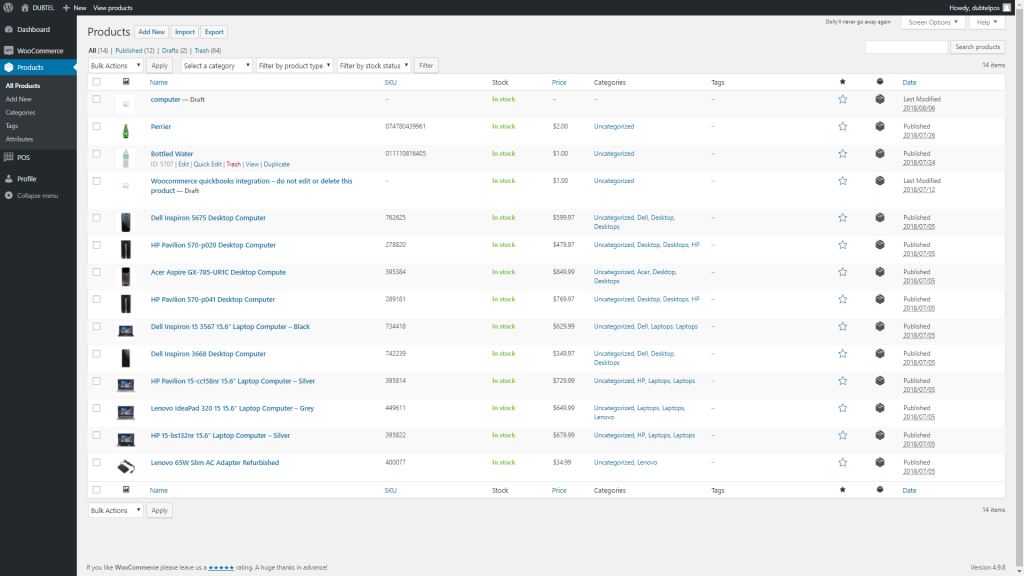
  1. In the menu on the left sidebar, click Products.
  2. To view product list, click �All Products�.


     4. On the top you can see the buttons: �Add New�, �Import� and �Export�.

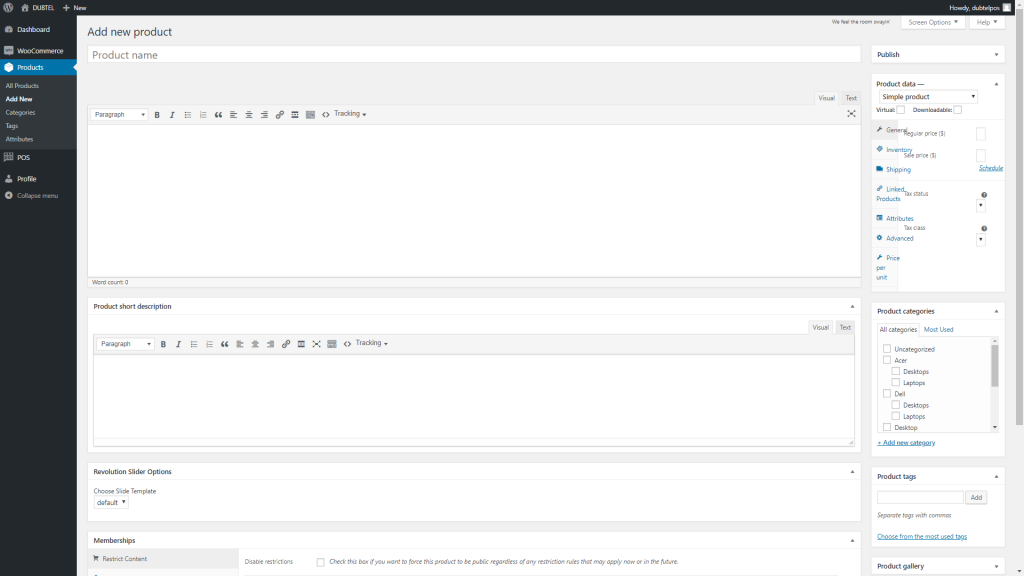
     5. To add a single product, click the 'Add New' button.

     6. Enter Product Name, Description, Product Categories, Product Data, Product Tags and Product Gallery.

     7. Click Publish. Product will be displayed on the cart.

     8. To add multiple products, you can use import button.

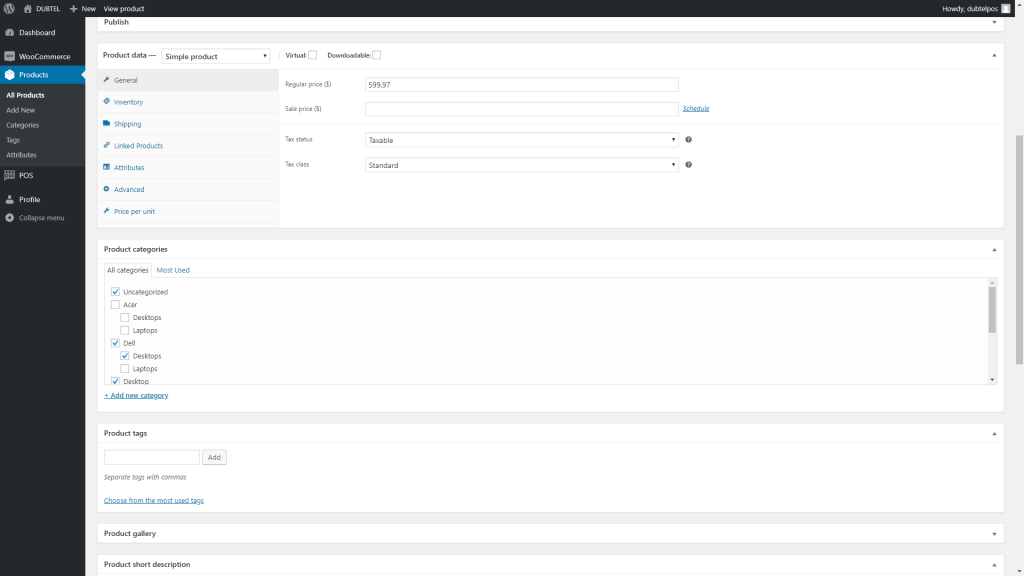
Edit product � Product Category
  1. In the store from menu on left click products.
  2. To view product list, click �All Products�.
  3. Click Edit link on the product you need to Edit.

     4. To change categories, scroll right to Product Categories section.

     5. Update from predefined category sections.

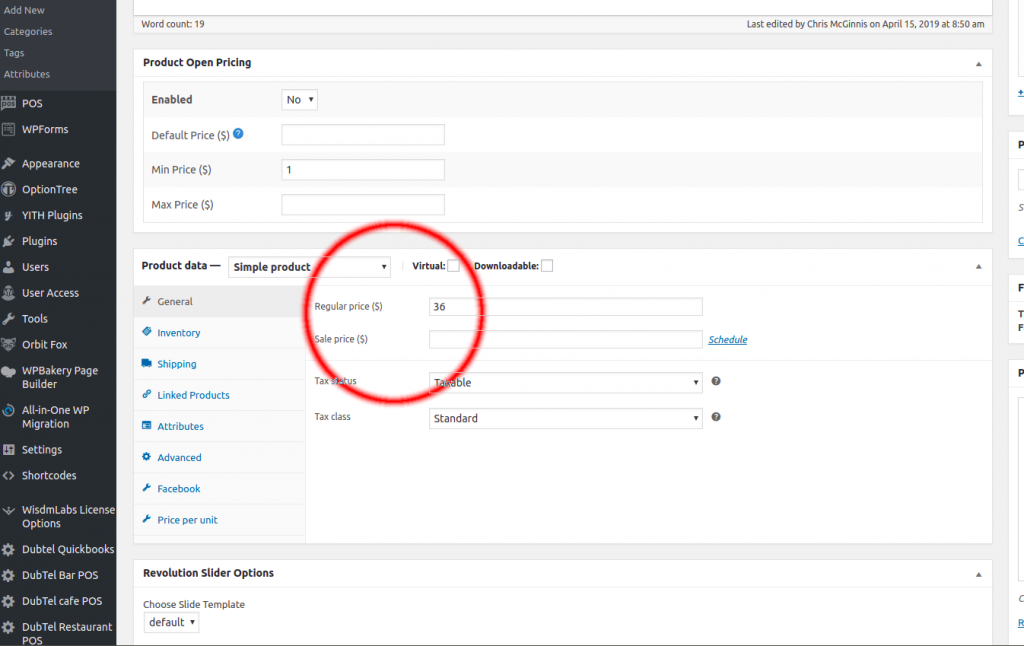
Edit product � Product Price
  1. In the store from menu on left click products.
  2. To view product list, click �All Products�.
  3. Click Edit link on the product you need to Edit.
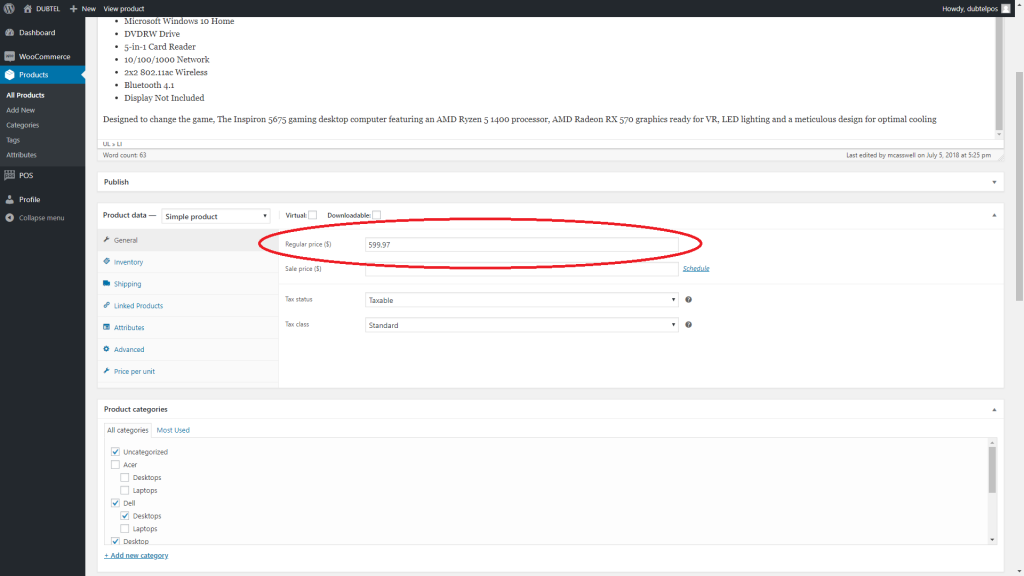
  4. To update price, scroll right to product data section.
  5. Click General tab which will show the fields to enter Regular price, Sales Price etc.
  6. Update the regular price as needed.
Edit product � Manage stock
  1. In the store from menu on left click products.
  2. To view product list, click �All Products�.
  3. Click Edit link on the product you need to Edit.
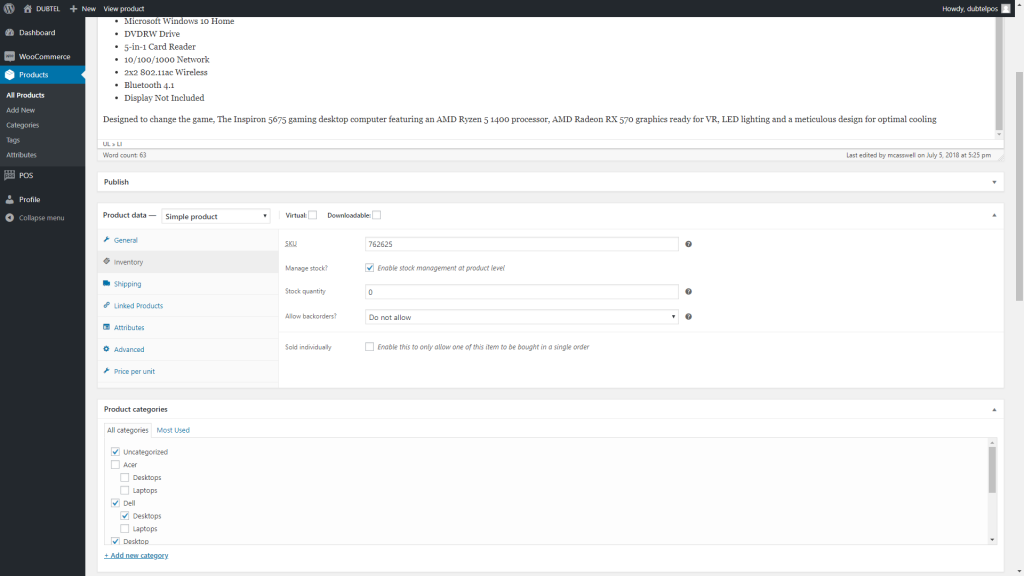
  4. To manage stock, scroll down to product data section.
  5. Click on the Inventory tab.
  6. There you will see option to manage SKU, Manage stock option, Stock status etc.
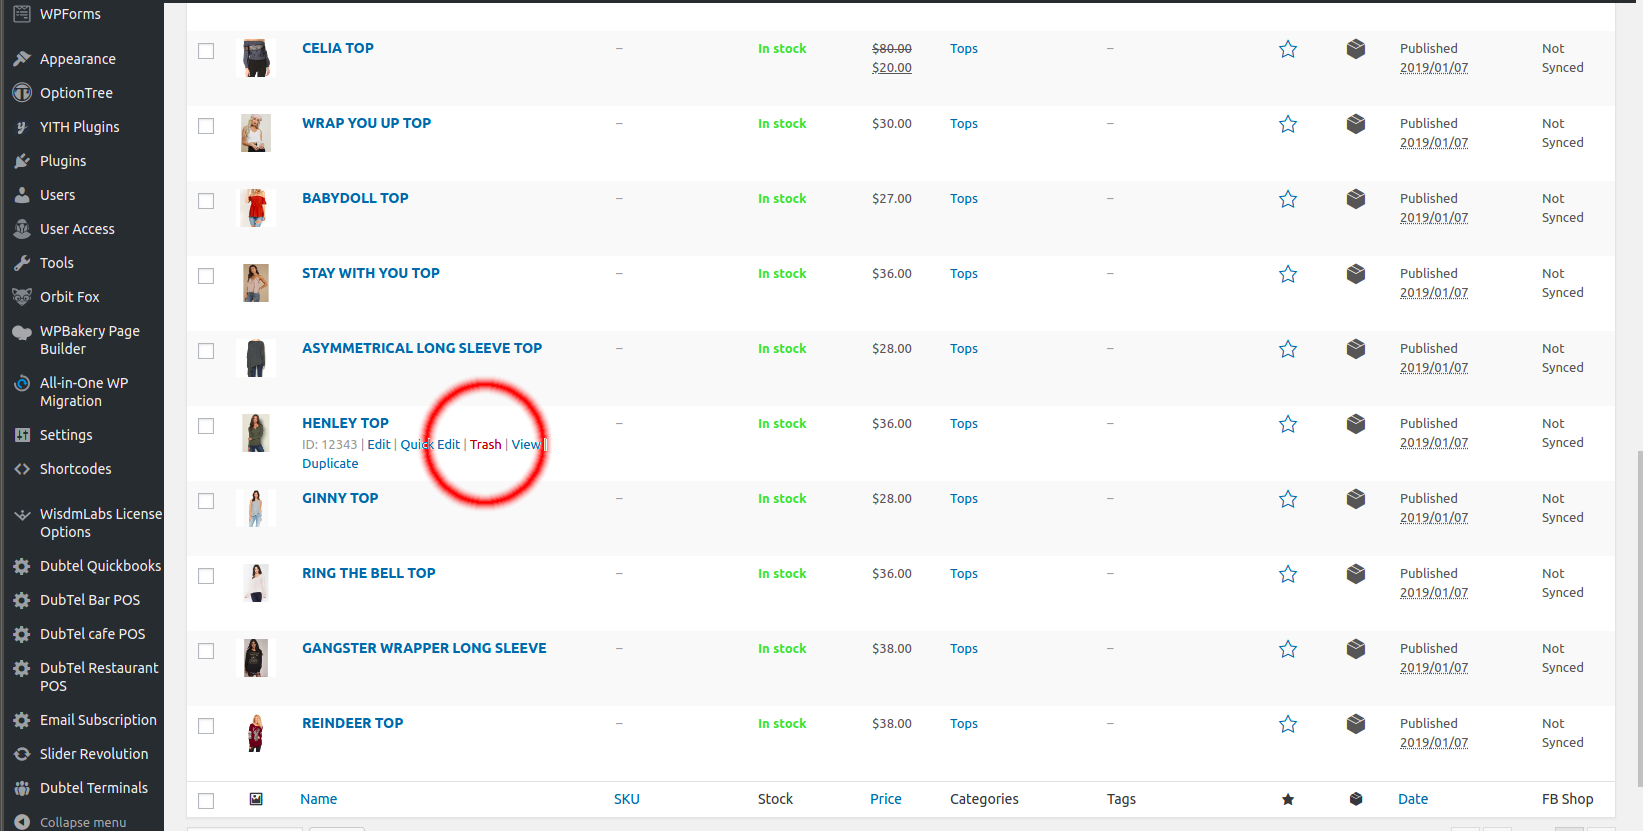
Delete Product
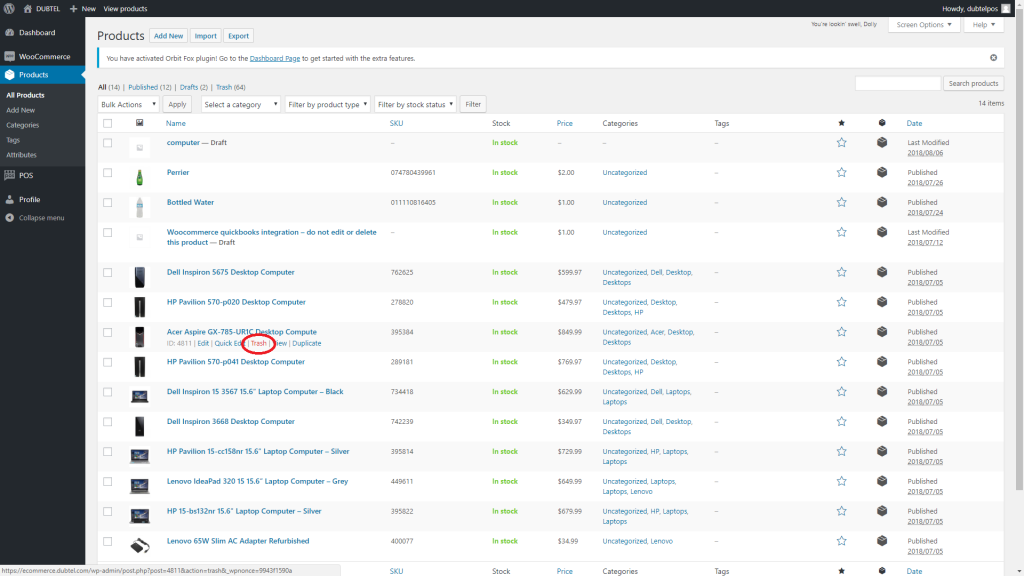
  1. In the store from menu on left click products.
  2. To view product list, click �All Products�.
  3. Click Trash link on the product you need to Delete
View orders
  1. In the store from menu on left click WooCommerce
  2. To view order list, click �Orders�.
  3. It will take you to the orders list.

QuickBooks

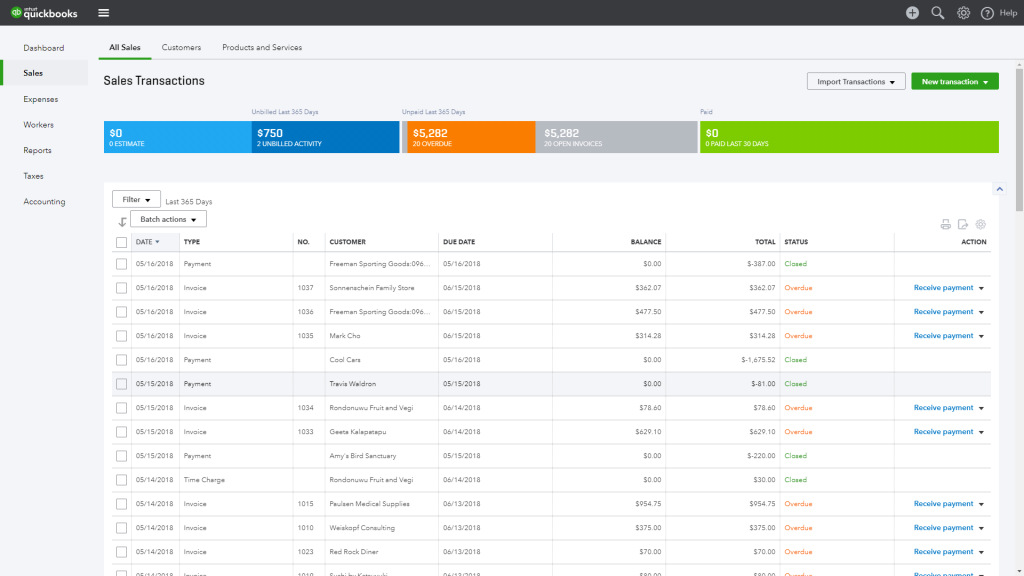
  1. Login to your QuickBooks account.
  2. Go to the Sales tab.
  3. Various Sales Transaction data can be found here and other reports.

QuickBooks

  1. Login to your QuickBooks account.
  2. Go to Sales tab.
  3. The view can be selected by daily, weekly, monthly and yearly. See the picture below.

Manage your store

  • Sign in to POS from PC
  1. Go to the wp-admin URL of your store. Login page will be displayed.
  2. Enter email and password. Click Login.
  3. It will take you to the store.
  • Add products to your store
  1. In the store from menu on left click products.
  2. To view product list, click �All Products�.
  1. On the top you can see buttons �Add New�, �Import� and �Export�
  2. To add single product Click Add New button.
  3. Enter Product Name, Description, Product Categories, Product Data, Product tags and product gallery
  1. Click Publish. Product will be displayed on the cart.
  2. To add multiple products, you can use import button.
  • Edit product � Product Category
  1. In the store from menu on left click products.
  2. To view product list, click �All Products�.
  3. Click Edit link on the product you need to Edit.
  1. To change categories, scroll right to Product Categories section.
  1. Update from predefined category sections.
  • Edit product � Product Price
  1. In the store from menu on left click products.
  2. To view product list, click �All Products�.
  3. Click Edit link on the product you need to Edit.
  4. To update price, scroll down to the product data section.
  5. This will show the fields to enter Regular price, Sales Price etc.
  1. Update the regular price as needed.
  • Edit product � Manage stock
  1. In the store from menu on left click products.
  2. To view product list, click �All Products�.
  3. Click Edit link on the product you need to Edit.
  4. To manage stock, scroll down to product data section.
  5. Click on the Inventory tab.
  6. There you will see option to manage SKU, Manage stock option, Stock status etc.
  • Delete Product
  1. In the store from menu on left click products.
  2. To view product list, click �All Products�.
  3. Click Trash link on the product you need to Delete
  1. It will remove the product from the product list.
  • View orders
  1. In the store from menu on left click WooCommerce
  2. To view order list, click �Orders�.
  3. It will take you to the orders list.

27Aug
  • Refund � POS

i. Refund orders through cash

  1. To refund, Click on the Menu on the top left of the screen.
  2. Click �Orders� from the Menu as shown below.
  3. It will take you to the orders list as shown below.
  4. Select the order to refund.
  5. Edit order page is shown. Scroll down to order details.
  6. Click on the refund button.
  7. Enter the refund amount and reason for refund which is optional as shown below.
  8. Click �Refund $Amount manually� button.
  9. A dialogue box will appear to confirm the refund. Click OK.
  10. The order detail page will show the refunded amount in Red.

ii. Refund orders though card

  1. Follow the same as Refund through cash from steps 1 through 10.
  2. To refund payments through card, once you click OK, It will redirect you to the assigned card reader and follow the steps to refund as per the card reader.
  3. Once refund processed successfully, the refunded amount will be displayed in red.
  • Check out � POS

Checkout via Cash

  1. To check out via cash click on the checkout button and it will take you to the check out page.
  2. The default tab will be cash.
  3. The total amount will be shown on the �Amount Tendered� box.
  4. Once you collect the cash, click �Process Payment� button.
  5. It will take you to receipt page.
  6. To continue shopping click �New order� button.
  7. Receipt can be printed out and sent via email. See pictures below.

Check out via Card

  1. To check out via card click on the checkout button and it will take you to the check out page.
  2. Click on the card tab.
  3. If you need any cashback, enter the amount.
  4. Click process payment button.
  5. It will take you to the assigned card reader on the machine.
  6. Once the payment is processed, it will take you to the receipt page.
  7. To continue shopping, click �New Order� button.
  8. Receipt can be printed out and sent via email. See pictures below.

Process a sale

Add to cart

  1. To Add product to cart click on the green plus button. The items selected will be displayed as shown below.

Check out � POS

  • Checkout via Cash
  1. To check out via cash click on the checkout button and it will take you to the check out page.
  2. The default tab will be cash.
  3. The total amount will be shown on the �Amount Tendered� box.
  4. Once you collect the cash, click �Process Payment� button.
  5. It will take you to receipt page.
  6. To continue shopping click �New order� button.
  7. Receipt can be printed out and sent via email. See pictures below.
  • Check out via Card
  1. To check out via card click on the checkout button and it will take you to the check out page.
  2. Click on the card tab.
  3. If you need any cashback, enter the amount.
  4. Click process payment button.
  5. It will take you to the assigned card reader on the machine.
  6. Once the payment is processed, it will take you to the receipt page.
  7. To continue shopping, click �New Order� button.
  8. Receipt can be printed out and sent via email. See pictures below.

Refund � POS

  • Refund orders through cash
  1. To refund, Click on the Menu on the top left of the screen.
  2. Click �Orders� from the Menu as shown below.
  1. It will take you to the orders list as shown below.
  1. Select the order to refund.
  2. Edit order page is shown. Scroll down to order details.
  1. Click on the refund button.
  2. Enter the refund amount and reason for refund which is optional as shown below.
  1. Click �Refund $Amount manually� button.
  2. A dialogue box will appear to confirm the refund. Click OK.
  1. The order detail page will show the refunded amount in Red.
  • Refund orders though card
  1. Follow the same as Refund through cash from steps 1 through 10.
  2. To refund payments through card, once you click OK, It will redirect you to the assigned card reader and follow the steps to refund as per the card reader.
  3. Once refund processed successfully, the refunded amount will be displayed in red.

27Aug
  • Logout

i. To Log out click on the user icon on top right of the home page. Logout option will display.  
ii. Click log out as shown below. 
27Aug

  • Login

i.�Power on � POS

  1. To Switch on the�POS�click on the power button on the right side of the device (Samsung Note) and when asked�to�enter�your PIN number. It will take you to the home page.

ii. Charging��POS

  1. Plug the supplied USB connector into the power/accessory interface connector on the bottom of your device.
  2. Plug the wall charger into an electrical outlet.
  3. To ensure your device is fast charging, open the Notification Panel by swiping from the top of the screen to the bottom.

iii. Sign�In via POS

  1. To sign in to POS using your Samsung Note. Click open app Fully Kiosk Browser already installed in your device.
  2. Login page will be displayed. Enter your user name and password and click login as shown�� below.
  3. �It will take you to the home page.